Hello World: Building a site in Swift with Publish
Welcome to my new site built almost (save some CSS) entirely in Swift using John Sundell’s Publish static site generator. John is the guy behind swiftbysundell.com and many more resources cherished by the iOS community. If you’re anything like me, you’ve been through multiple phases of sites built in ways ranging from raw HTML, Vapor Leaf to, possibly, Apple’s old iWeb app. Remember that? Maybe you’ve tried other generators like Jekyll or Hugo. Nothing has felt as natural to me as a Swift developer until now with Publish.
Static sites vs. dynamic sites
First, what does “static” mean and when do you use it instead of a “dynamic” website? If you’re looking to build a chat web app or an online store that relies on a database, you’re gonna need a server constantly updating the user with the appropriate information. That makes the site dynamic. The server is building files as needed and sending them your way. I’d recommend using Vapor for that type of task. Contrast that with a static site that is just a bunch of files that are all prebuilt and waiting to be shown once you navigate to them. Static sites are faster, safer and cheaper to name a few but if every time you wanted to make a change to your header, for example, you’d need to edit each file, that would get extremely tedious and error-prone. That’s where static site generators like Publish come in. In no way does Publish aim to replace HTML or CSS. Instead, it makes writing it a whole lot easier and enjoyable. Generating a site with Publish is as easy as entering publish generate in the command line and it takes your Swift code and creates all those static HTML files for you that you can host wherever you’d like.
Plot
You create the HTML using Plot, a type-safe domain-specific language or DSL that's included together with Publish. This means .h1(“Hello world”) will be generated as <h1>Hello world</h1> and will make sure you’re only able to put values in there that make sense. Try throwing an li element in there and you’ll get a compile time error. This also allows Xcode to provide autocomplete suggestions while typing your code. Later, we’ll make use of Plot to create a theme which is the backbone of our site generation.
Step 1: Install Publish CLI
It’s really easy to start a new project using the Publish command line tool. First, open Terminal and clone the Publish repository. Then, in the cloned folder, run make.
$ git clone https://github.com/JohnSundell/Publish.git
$ cd Publish
$ make
Step 2: Create a new website
Now, all you have to do is create your website directory wherever you wish, change to that directory and enter publish new. We’re going to create a site which details our travels across the world.
$ mkdir MyTravels
$ cd MyTravels
$ publish new
At this point, you can open the project up in Xcode by entering open Package.swift and get started on the site. The first thing you'll notice is, of course, the website's package. At its core, a Publish site is just a Swift package which means you could include any other dependencies you'd like besides the necessary Publish one. The next thing you'll notice is the generated file structure. What are all these directories and files you ask? Let's dive right in.
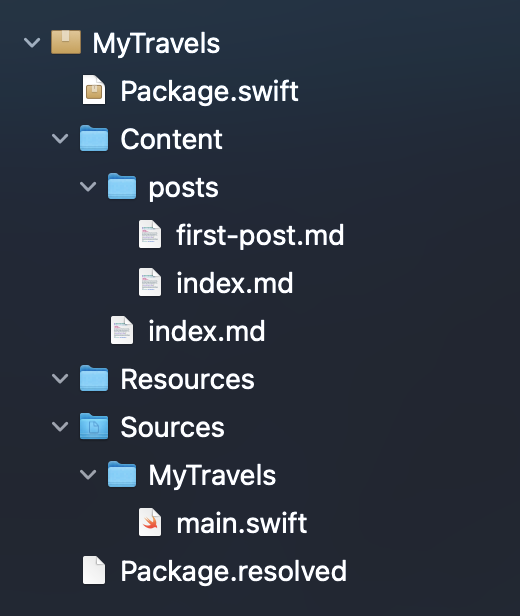
Step 3: Publish site in main.swift
Conforming with the file structure of a Swift package, Publish created a main.swift file in the MyTravels target directory of the Sources directory to serve as the executable of our website as specified in our package. Open that up and you'll see our website's core code. Publish already created a struct that conforms to Website and filled in the required properties and types. I've updated the information to better match what we'd like our website to contain. Namely, articles about countries and cities we've visited.
struct MyTravels: Website {
  enum SectionID: String, WebsiteSectionID {
    case countries
    case cities
    case about
  }

  struct ItemMetadata: WebsiteItemMetadata {
    var arrivalDate: Date
    var departureDate: Date
    var transportation: Transportation

    enum Transportation: String, WebsiteItemMetadata {
      case car
      case train
      case plane
    }
  }

  var url = URL(string: "https://mytravels.com")!
  var name = "My Travels"
  var description = "Sharing my travels across the world"
  var language: Language { .english }
  var imagePath: Path? { nil }
}
A Publish site is built upon three layers of content. Firstly, a Section is configured by adding a case to the required SectionID enumeration. Once we build the HTML, sections will be displayed in the navigation element, get their own dedicated page and, if applicable, can display and link to the next crucial layer: items. An Item can be created within the file structure of the package as will be discussed next or programmatically as shown below. Conforming to Website also requires us to have an ItemMetadata type which can include (you guessed it) item metadata like an arrival date in our case. Of course, an HTML page can also be created to display any given item. Lastly, we can create stand-alone Pages like a 404 page for instance.
Finally, to publish our site there's an appropriately named publish function which generates our site and creates an Output folder with our HTML and resources.
try MyTravels().publish(
  withTheme: .foundation,
  additionalSteps: [
    .addItem(Item(
      path: "new-york-city",
      sectionID: .cities,
      metadata: MyTravels.ItemMetadata(
        arrivalDate: Date(),
        departureDate: Date().addingTimeInterval(60 * 60 * 24),
        transportation: .train),
      content: Content(
        title: "New York City",
        description: "The city that never sleeps.")))
  ]
)
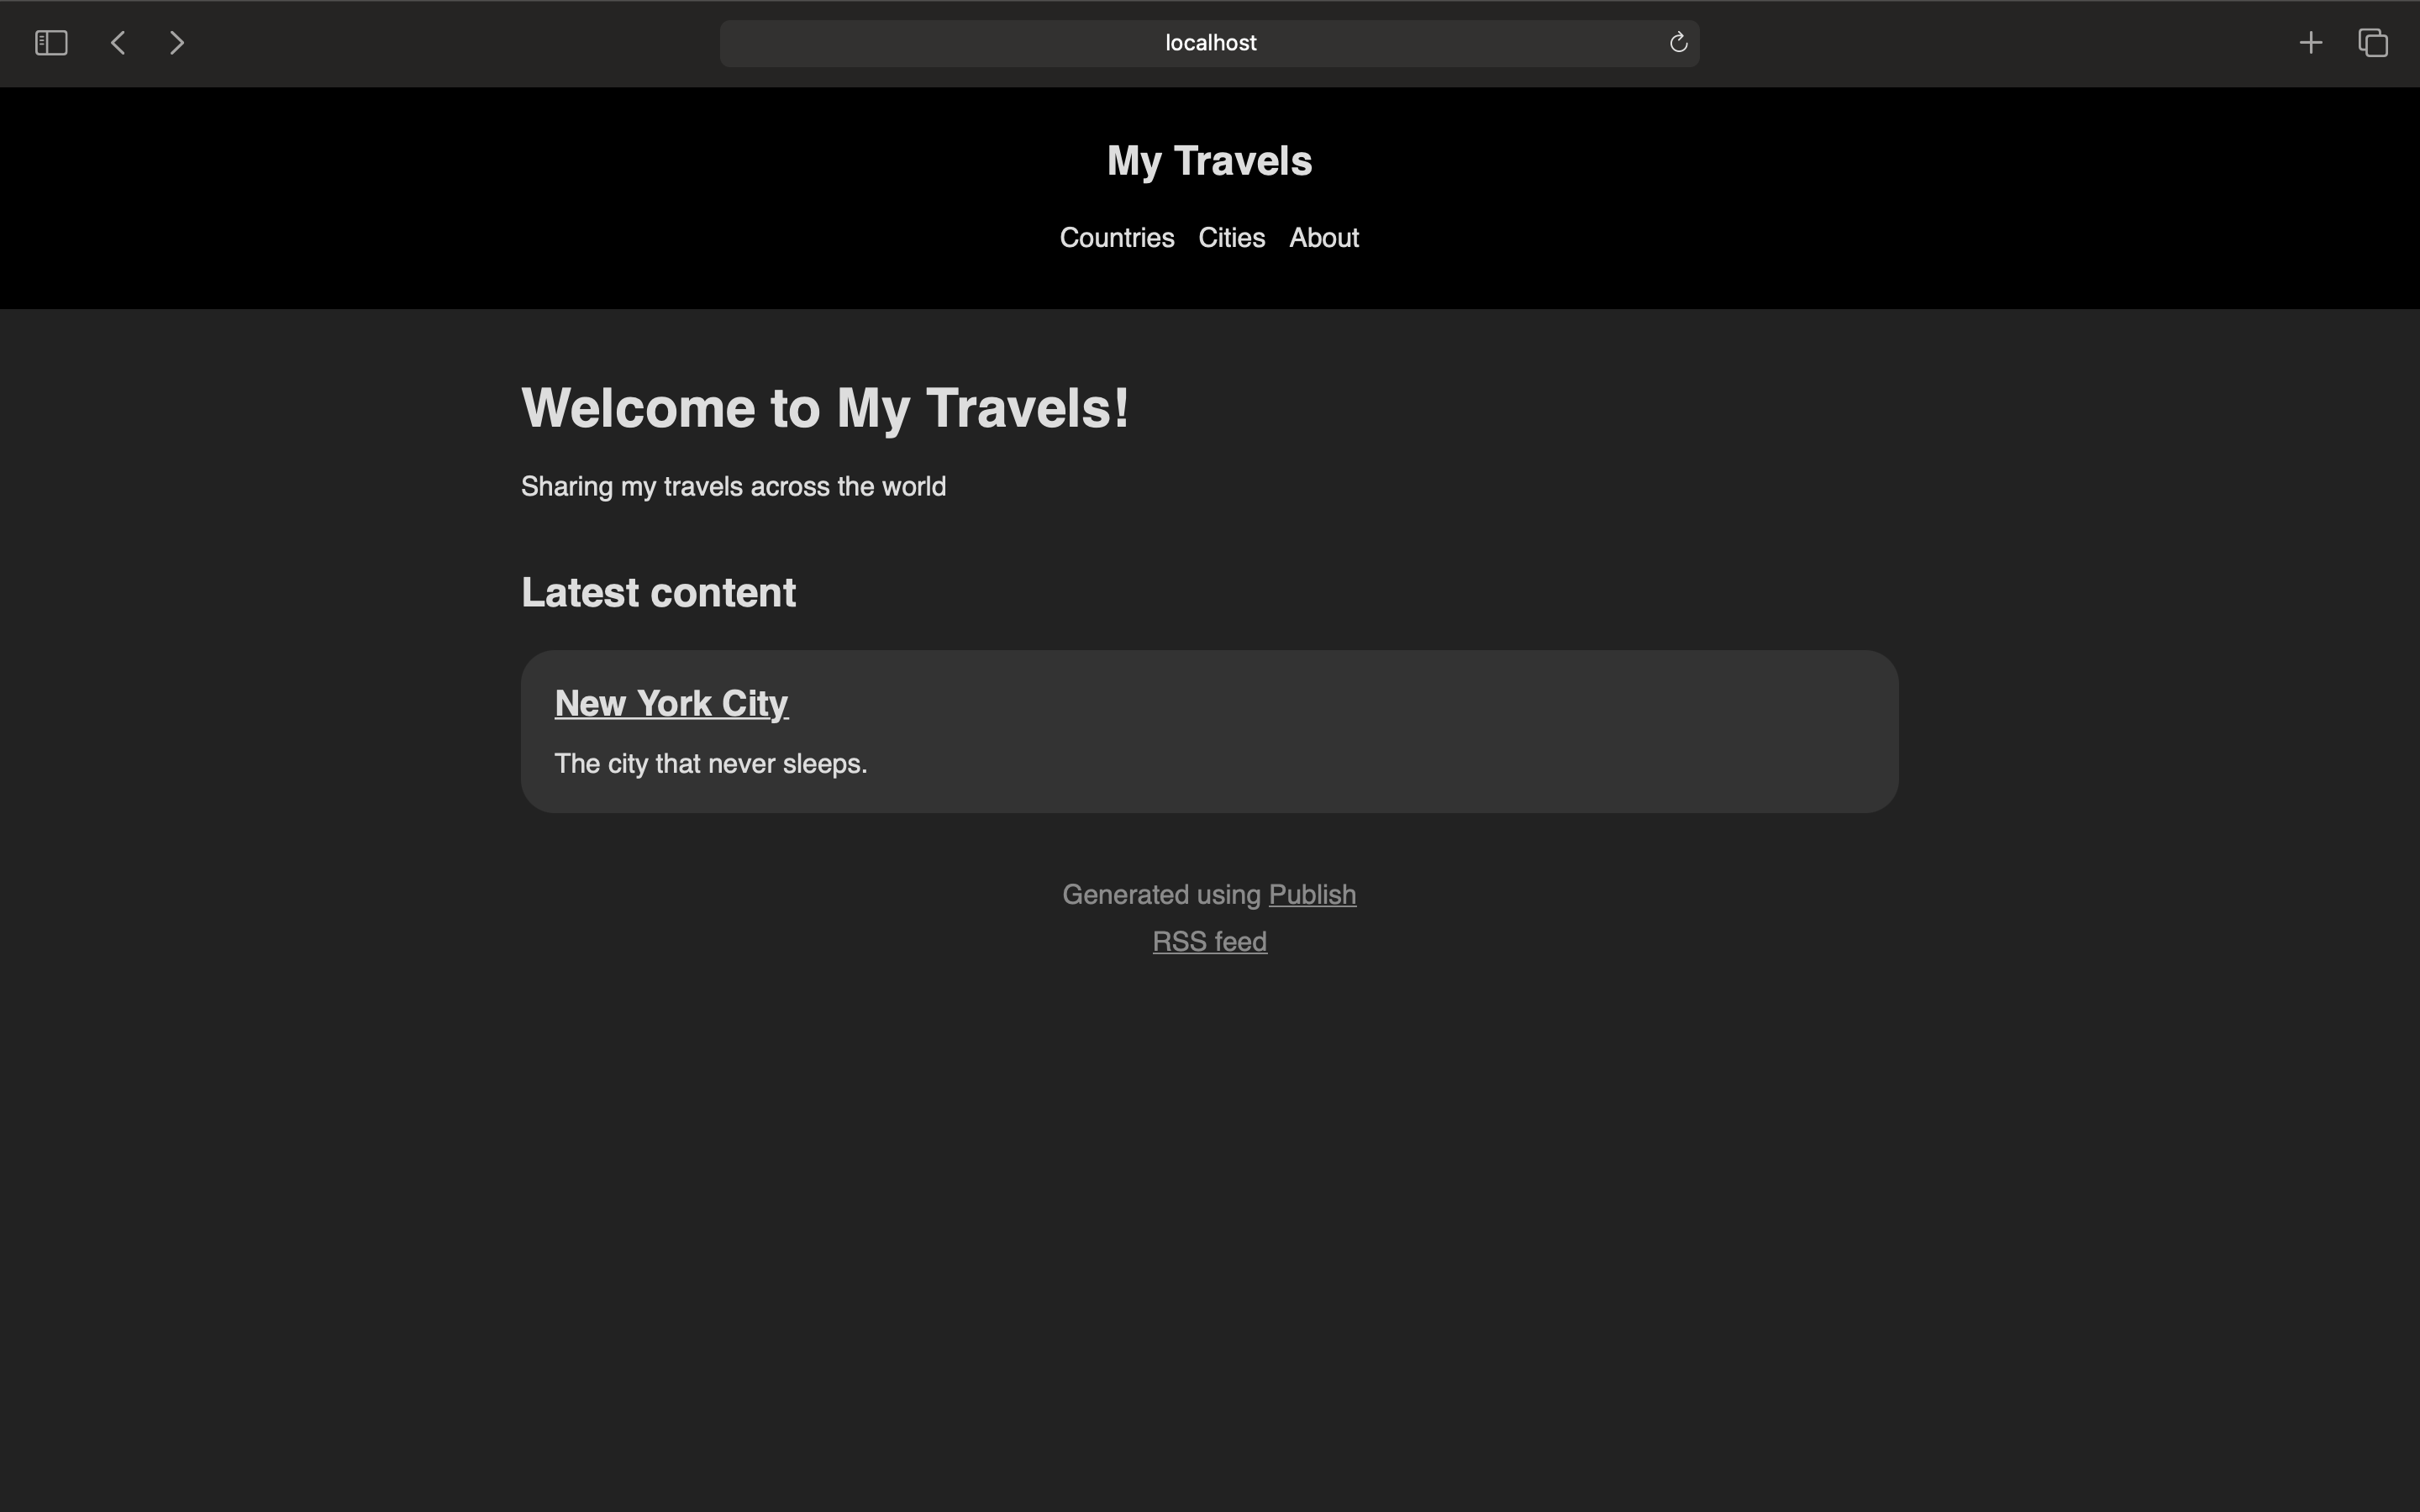
At the point, if we go back to Terminal and enter publish run in our website's directory and go to localhost:8000 we'll see a page that includes our sections and the item we added previously. Pretty simple to get our site running! Without writing any HTML or CSS, Publish generated our Swift code directly into a functioning website! Indeed, we instructed Publish to do this by using the built-in .foundation theme. Soon, we'll see how we can create a custom theme and, subsequently, replace .foundation with it.
Step 4: Add items to /Content
Ink
Thus far, we've seen how to add an item programmatically. Publish can also convert Markdown files placed into the Content folder into items automatically for you. Publish utilizes another dependency called Ink to handle this but you don't need to interact with it directly. First, create a directory matching the name of the section you want to add items to. Then, create a Markdown file in that folder which, in our case, will be called san-francisco.md.
---
description: Exploring the Golden City.
arrivalDate: 2020-6-22 6:00
departureDate: 2020-6-26 10:00
transportation: plane
---
# San Francisco
This city is so beautiful.

Publish can use our H1 heading as the title of the item or you can specify one in the top metadata as such, title: San Francisco. We've also added a description to the metadata and included our custom metadata as detailed in our website's ItemMetadata. Any resources added to the Resources folder will be copied to the generated site and made available to use throughout our code as we did here with the image. Once we run, Publish will parse our Markdown files and use each file's path as the path on our site. If you want to specify the path regardless of the your own file path just add path: path/to/your/item to the metadata although it still needs to have a parent folder with the section's name. Optionally, the Content folder can include an index.md file with content we'd like to display on the website's home page. Furthermore, each section's folder can also include its own index.md file with content it would like to show on its page like at mytavels.com/cities for example. Presumably, you'd also include the section's list of items on a page similar to that one. Finally, free-form pages can be added as well by adding a Markdown file named as whatever you'd like to the Content directory.
Step 5: Create a custom theme
If we want Publish to generate our website with our own HTML and styling we need to create a theme. A theme is powered by a type that conforms to HTMLFactory. The protocol requires us to implement six methods that provide an HTML value for the various pages Publish needs to render. We'll implement the method for creating the main index page, makeIndexHTML(for index: Index, context: PublishingContext<MyTravels>), here and, for the rest, you can return an empty HTML value for now like so, HTML(). Let's start by simply returning "Hello World" for the index HTML and make sure everything works.
struct BasicHTMLFactory: HTMLFactory {
  func makeIndexHTML(for index: Index, context: PublishingContext<MyTravels>) throws -> HTML {
    HTML("Hello World")
  }
  ...
}
Next, we'll create a theme using our factory type.
extension Theme where Site == MyTravels {
  static var basic: Self {
    Theme(htmlFactory: BasicHTMLFactory())
  }
}
Finally, update the theme to publish with to .basic.
try MyTravels().publish(
  withTheme: .basic,
  ...
)
Now if you run again and reload the the site you should see Hello World! Next, let's write some simple HTML to display our actual website data which is made available through context.
func makeIndexHTML(for index: Index, context: PublishingContext<MyTravels>) throws -> HTML {
  HTML(
    .lang(context.site.language),
    .head(for: index, on: context.site),
    .body(
      // Header
      .h1(.text(context.site.name)),
      .h2(.text(context.site.description)),
      // Navigation
      .nav(.ul(
        .forEach(Site.SectionID.allCases) { section in
          .li(.a(
            .href(context.sections[section].path),
            .text(context.sections[section].title)
          ))
        }
      )),
      // Items
      .ul(.forEach(context.allItems(sortedBy: \.date, order: .descending)) { item in
        .li(
          .a(
            .href(item.path),
            .text(item.title)
          ),
          .p(.text(item.description))
        )
      })
    )
  )
}
If you're familiar with HTML, the above should be pretty straightforward. Besides the usual HTML elements, we can also make use of additional powerful ones like .forEach as we do here. Currently, CSS still needs to be written manually in a .css file, stored in Resources and specified in the .head element. Fortunately, John is working on a "SwiftUI inspired" update to Plot with type-safe CSS support and even has a running prototype!
Xcode Previews + Plot's new SwiftUI-inspired Component API = Type-safe, live-updating HTML + CSS! 😍
— John Sundell (@johnsundell) October 30, 2020
(still just a prototype, and updates are a bit slow while I'm also recording my screen, but I'm really starting to get excited about the potential of this! 😀) pic.twitter.com/XoWjr6vfWa
Step 6: Deploy! 🎉
Last but not least, let's deploy our website so it's available online. Like everything else with Publish, it's of course really simple. We're going to be using GitHub Pages so, if you're not familiar, read this first. Once you have your Pages repo ready, all you need to do is add it to the publish method with your username and the repo's name. We're going to skip using SSH here.
try MyTravels().publish(
	...
  deployedUsing: .gitHub("yourUsername/MyTravels", useSSH: false),
  ...
)
Back in Terminal, simply enter publish deploy and once it's done, if you set up Pages correctly, you should have a running website available to the world! Congratulations! 🍾
It's at this point building my own site that I realized I would need to manage two repos. One for my site's Swift code and one for Pages. That didn't feel right knowing that you can choose a branch for Pages to use in an existing repo, and naturally, that's what I wanted to do. It turns out that there's a recent commit to the Publish repo that allows this (currently it only deploys to master) but it hasn't been added to a new Publish release yet. I attempted to use Publish's master branch in my package and use the feature but it didn't work for me. However, it doesn't matter since there's a better way to get it done and that entails some automation.
Automation from r/ProgrammerHumor
Having to run publish deploy every time you commit changes to your site can get repetitive and pretty cumbersome. Furthermore, say you commit changes to your site from an iPad and, of course, you want those changes to be reflected on your public site. Currently, you need to go back to your Mac, open Terminal and, once again, enter publish deploy. GitHub Actions is our friend in this case. Now, whenever you commit changes to your site’s repo, GitHub will run a workflow to generate your site, store the output in a separate branch and Pages will make that available. All this means we never need to run publish deploy ourselves and don’t even need to include deployedUsing in our publish method. Our workflow will simply run publish generate which creates the Output folder and then copy that data to our Pages branch.
First, create a repo for your site’s Swift code if you haven’t already. Now, we need to make an empty branch for our public site like so, git checkout --orphan release. I’ve named it release but name it whatever you wish. Next, remove all staged files, git rm -rf .. You need to create a commit as you can’t push an empty branch, git commit --allow-empty -m "Initial commit". Finally, push your empty branch, git push origin release. Once that’s fully uploaded, set up GitHub Pages with the source as our release branch. Now, back in your site’s master branch in Terminal, create a .github/workflows directory with a .yml file inside (deploy.yml for example). We’re going to make use of a workflow detailed here. Set the publish_branch at the bottom to your Pages branch.
name: Deploy

on:
  push:
    branches:
      - master

jobs:
  deploy:
    runs-on: macos-latest
    steps:
      - uses: actions/checkout@v2

      - uses: actions/cache@v2
        with:
          path: |
            ~/Publish_build
            .build
          key: ${{ runner.os }}-spm-${{ hashFiles('**/Package.resolved') }}
          restore-keys: |
            ${{ runner.os }}-spm-
      - name: Setup JohnSundell/Publish
        run: |
          cd ${HOME}
          export PUBLISH_VERSION="0.7.0"
          git clone https://github.com/JohnSundell/Publish.git
          cd ./Publish && git checkout ${PUBLISH_VERSION}
          mv ~/Publish_build .build || true
          swift build -c release
          cp -r .build ~/Publish_build || true
          echo "${HOME}/Publish/.build/release" >> ${GITHUB_PATH}
      - run: publish-cli generate

      - name: Deploy to GitHub Pages
        uses: peaceiris/actions-gh-pages@v3
        with:
          github_token: ${{ secrets.GITHUB_TOKEN }}
          publish_branch: release
          publish_dir: ./Output
Immediately, once you commit the changes, GitHub will start running the workflow as indicated by an orange dot on the latest commit. Once it finishes, it will display a green checkmark and you’ve now automated Publish! As always, automation required some invested extra time and now your site will always be up to date.
Conclusion
As I hope I’ve demonstrated, there’s never been a better time as an iOS and Swift developer to create a site of their own. Whether it’s a blog, app landing page or a portfolio, use the power of Swift to build it. I can’t wait to see what John dreams up for future updates and what ya’ll create as well. Please share your sites, thoughts and comments with me @niazoff. Checkout the site we built on GitHub, MyTravels, and my site, niazoff.com.